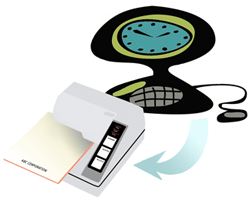
DocuClock program Starts with 'Printer Off-Line'
-
Check that
the DocuClock printer is turned on and power light is lit. Run the
printer self-test
-
Check that
the proper cable is plugged into both printer and computer.
-
Double check
the port on the computer you are using. Serial ports and parallel ports
are often not labeled and can be confused with one another.
-
Check that
the port you are using is enabled and working in Windows (see
next section)
Back to top of
page
Serial or Parallel—which printer do you have?
On the side of the DocuClock printer check the model number
on the ID label. If it is
TM-U295,
it is a serial printer, if it says
TM-U295P
it’s a parallel printer.
Back to top of
page
Checking the Serial or
Parallel Port in Windows
To check that the
serial or parallel port is installed and working in Windows:
-
Open the Device Manager in the Windows Control
Panel:
Control Panel->System->Hardware->Device Manager
-
Scroll down to the ‘Ports’ section
-
Find the port you are using:
-Verify that the port is ‘working properly’
by clicking on the port and opening the property window.
-Parallel port users should also note the
type of parallel port in use: ECP, EPP, etc. and refer to the
next section to verify compatibility.
Setting the parallel port in BIOS on most
Dell computers:
-
Press and hold the “Del” button just after
rebooting your computer
-
Go to the ‘Advanced’ menu from the main BIOS
menu
-
Go to Peripheral Configuration->Parallel
Port->Mode
-
Change setting from ‘Bi-directional’ or 'EPP'
to ‘ECP’
-
Save the changes before exiting
Back to top of
page
DocuClock Parallel stays off-line and doesn't connect
with computer
A. BIOS Settings
If after starting the software for the first
time and your printer comes up "Off Line" you may need to check the
computer's parallel port settings. Some parallel port mode settings may not allow your DocuClock printer and
computer to communicate properly. These settings may be checked and changed
in the computer’s basic setup (BIOS) menu.
The Parallel
or LPT port connected to DocuClock must be set to ‘Normal’ or ‘Standard’ in
the BIOS setup. Many computers set the Parallel port to the ‘EPP’ or ‘Advanced’
mode which is incompatible with DocuClock.
To open the
BIOS setup for most PCs:
-
Press and
hold the "Del" or "F1" button just after rebooting your PC.
-
Locate the
menu for
setting the Parallel port mode. Parallel mode setting might be in the
option "Integrated Peripherals" or "Bios Feature Setup" or "Chipset
Feature Setup".
-
Change the
Parallel mode setting to “Normal”, "ECP" or “Standard”. Other choices such as ‘EPP’,
‘Bi-directional’, ‘Enhanced’ or ‘Advanced’
may not work properly with DocuClock.
-
Save the
changes you had just made when exiting the BIOS menu.
-
Restart your
computer, turn on the DocuClock printer and start the DocuClock program.
If the printer is now “On-Line” then DocuClock is communicating with the
computer
B.
Another Printer
is assigned to the Port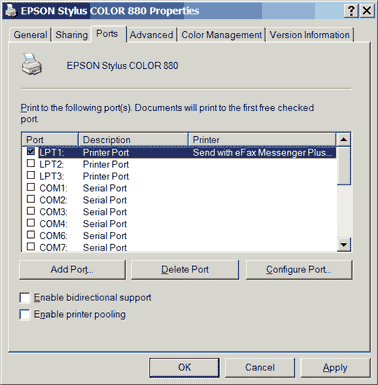
DocuClock requires exclusive control of the port
it is using. DocuClock users should check the Printers section in the Windows
Control Panel to see if there is a printer listed that uses the same port as DocuClock (usually LPT1
for parallel printers and COM1 for serial printers). Any other
printers listed in the Control Panel assigned to the same port should be
modified or deleted. This includes so-called virtual printers that have no
physical presence but are assigned to the same port as DocuClock.
You can check which port an individual
printer is assigned to by right clicking the printer icon in the Printer icon in
the Control Panel and checking the 'properties' section for the printer. The
"Ports" tab will show which port the printer is using. You can see if the port
is the same one you are trying to use for DocuClock.
Note: DocuClock does not normally appear as a printer in the Control Panel.
Back to top of
page
DocuClock
won’t print
In the cases where
DocuClock stops printing, check to be sure
that:
-
Printer
is on and panel lights are on.
-
Cable is connected to the printer and the
computer.
-
DocuClock program or Service is currently running on the
computer.
-
The paper is not in the 'Release' mode.
-
Paper has been introduced to the printer
sensor and the printer is in the Automatic mode, or, the Time Stamp button
has been pressed.
Back to top of
page
DocuClock
won’t stop printing
In the cases where
DocuClock Serial printer won't stop printing garbage characters as
soon as you start the DocuClock software:
Back to top of
page
Time string printed is in wrong format
Back to top of
page
The time stamp is not accurate
-
The accuracy of the time stamp depends on the accuracy of
the computer’s clock. Check the computer clock time and settings by
choosing Start>Control
Panel>Date and Time. Verify the time zone and daylight savings settings.
-
The computer clock may run inaccurately and needs to be
synchronized to the Atomic Clock using ClockWatch. Install ClockWatch
from the DocuClock
CD
and run program to reset the computer’s clock. Contact Beagle Software
for the ClockWatch keycode if it is not included on the back of the CD
envelope.
-
NASD Compliance note: it is
recommended that ClockWatch Pro be used for time synchronization at
startup and periodically during the day (every 2 or 4 hours). These
settings can be established by opening ClockWatch, then choose
Options>Clock Setting.
-
You may also review the ClockWatch
user guide (pdf) or
troubleshooting page for additional
information on syncing your computer to the Atomic Clock.
Back to top of
page
Registration screen appears at startup
-
The user has
not been added to DocuClock. Most often DocuClock is
installed and used by the same user. You can add new users in
Windows NT, 2k or Windows XP, by running the
AddNewUser utility. This utility allows a new user without
administrative privileges to use DocuClock.
Steps for adding DocuClock users (assuming the computer administrator has
previously installed the full version of DocuClock):
1.
A new user logs on to the
computer.
2. The
new user runs the AddNewUser
utility found in the main DocuClock directory, typically C:\Program
Files\Beagle Software\DocuClock.
3. After
running the utility, the user can run the program.
4. The
user controls their own personal options settings, but share the same log
file as other users.
Note: only one user can use DocuClock at any given time
-
The Windows System Registry has been altered or
corrupted: Re-enter the keycode to re-register the software.
Back to top of page
Installation Problems
If after installing
DocuClock you get a runtime error when starting DocuClock such as:
Run time
error “372” - failed to load control CommonDialog from
COMDLG32.OCX
Your
version of COMDLG32.OCX may be outdated.
Or
OLEAUT32.dll
is out of date. A newer version is required for this program.
Indicates that
the common control DocuClock uses was not installed during installation and
needs to be updated. To update the file, follow these steps:
-
Identify the
name of the control by reading the error message. Controls have file names
that end in “OCX” or “DLL”. Write down the name of the control.
-
Open an
MS-DOS window by choosing Start>Programs>MS-DOS Prompt. This will open
the "MS-DOS Prompt" window. You should see a C:\WINDOWS> prompt.
-
Type "cd
system" (do not type the quotation marks) and press <Enter.> This will
change the prompt to C:\WINDOWS\SYSTEM>.
-
Rename
the older version of the control identified in step 1 by typing “ren
control control.old”
for example "ren
comdlg32.ocx comdlg32.old"
and press <Enter> (again, do not type the quotation marks.)
-
If your Run
Time Error message specifies a different file, replace "comdlg32" with
your specified file. This will rename the file and return the prompt to
C:\WINDOWS\SYSTEM>.
-
Close
the "MS-DOS Prompt" window by clicking the
X
button in the top right corner.
-
Reinstall
DocuClock over the existing installation, updating the control.
If you are still experiencing problems
Beagle Software support or call 612-370-1091 with the exact text of error message
you are seeing.
Back to top of
page
Windows reports a new device is found when I turn on the
computer and asks for a driver. DocuClock works fine, now what?
The message is due to the Plug and Play identity of the printer, that is,
how Windows identifies the DocuClock printer. Printing is done by the
DocuClock Printer Drivers that are installed with DocuClock. The Plug and
Play compatibility is neither required or used. Therefore, the message can
be ignored.
When Windows declares that it has found new hardware, allow Windows to
search for the device driver. Windows will not find an appropriate driver
and will ask what should be done next. Select "Disable device" or "Load
device without a driver." Remember, this is the Plug and Play aspect, NOT
the printing aspect; disabling or loading this device without the driver
will not effect printing to that device in any way. Once disabled, Windows
will not ask about the device again.
This message usually occurs on parallel DocuClock printers installed on
Windows 98SE Windows 2000 or Windows XP systems.
Back to top of
page
How to run the diagnostic routine
If you have verified the printer connection, you can run DocuClock in the
diagnostic mode, which provides a trace log to pinpoint problems. The
following steps will run DocuClock in the background diagnostic mode and
allow you to view the trace file. (DebugFile.txt)
-
Run
DocuClock in trace mode using the debug option from the command line until
error occurs.
-
View
the diagnostic trace by opening the debug file,
DebugFile.txt,
in the DocuClock program directory.
-
Check for “ERRORS” or connection problems in the
trace. You can
the DebugFile.txt file to Beagle Software for
assistance. Please include some background information on the situation.
Back to top of
page
|